I've been thinking about it for a while to be fair.
What I'm thinking about is an 8 shaft folding jack loom. The interesting part comes when I point out that I'm going to build an electric dobby controller into the bottom of it so it operates from one pedal and a computer program.
So far I've been thinking and thinking and I'm basically roughly copying the kind of frame you'd find in a Siever's school or Baby wolf loom. Basically it's like an X that folds up on itself with the castle in the middle. Should be able to reduce it's depth from 3 feet to about 1 for storage.
I don't think it's really that difficult to design the loom frame, aside from building the beams and making the ratchets and so on, which I may just jigsaw out of thick MDF. I have most of the wood I need asides from some panelling and I need to buy some aluminium sheet to make the shaft dividers with and also to hold the shaft bodies together with.
The rising levers will probably be made from mdf 6mm panelling, perhaps with rollers or aluminium plating on the ends to stop it from wearing.
underneath the levers there'll be about 8" of space for the wires to go down before entering the selection box, which shall be controlled by servo motors (I have them from a previous project, I also have the programming for a 16 shaft controller nearly done already and the electronics are all laid out so I'll just have to fit them into the new frame).
Then I have to figure out the best way to set up the pedal, whether front or back levered, or if there's a way I could easily create an assisted lift, or even put in a wheel there.
If I was to use a wheel then there's be less wasted mechanical energy in lifting and dropping the shafts, but it's a little complicated. Of course the thing about a rotary mechanism is it could just turn and turn and raise and lower the shafts automatically if powered by a motor or a bicycle pedal which then offers the possibility for further automation of the mechanism, though it's probably troublesome to install automatic beating and weft insertion on a 2ft wide folding jack loom.
But you never know, as long as the frame was sturdy enough I don't see a problem, assuming I can make all the mechanical parts out of MDF. I'm convinced it's possible, with enough tinkering.
Maybe I'll just start with a pedal then try adding a wheel for shedding.
Anyway, I'm going to throw up my diagrams here. As you shall see, I am not trained in the art of the technical draftsman
 General side view and approximate dimensions. I may change my mind on the exact height
 More detailed calculations here, trying to figure out relationships between the height of the castle, where the bolts go and the length of the folding legs
 Building the depth of the castle, taking into account the wood and cladding for the shafts (which have to be square and rigid as well as smooth) and clearance and dividers (which will be made from doubled over aluminium plating)
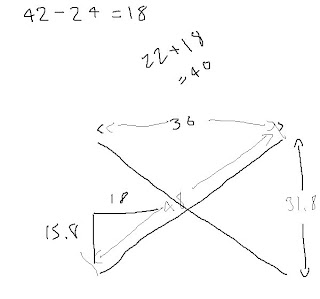
 Figuring out the total weaving width, and then from there the exact width of the frame, taking into account washers and clearance space again. One arm will have to wider than the other, I think it should be the one that carries the beater and cloth beam, as the beater needs something wider than itself to pivot from. The warp beam can afford to be a little narrower than the cloth beam. So i think anyway.
 A double arm raising jack action. Perhaps unecessarily complicated, but it does look very effective.
 The shed. Dictated by the size of the heddles, the maximum shed depth is 6" at the shaft.
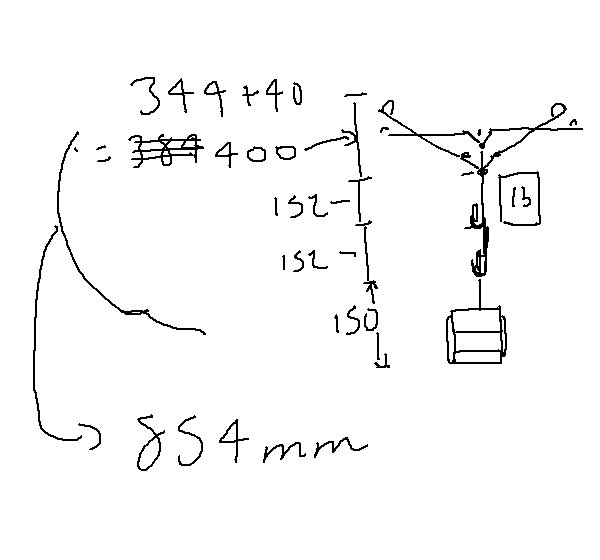
 Figuring out the height of the castle and how big the lifting zone needs to be. Everything is now in millimeteres. The lifting zone has to be the height of the shaft (heddles, plus generous clearance plus the shaft frame) plus the lifting height.
In order to reduce height and because i think it's pretty I've set it so the shafts will raise a couple inches out of the castle. I find that pleasing.
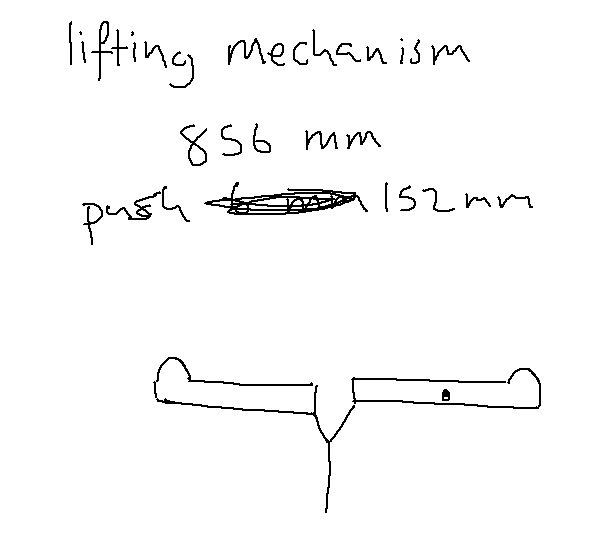
 The total space for the lifting mechanism (the jack action) which shall go under the shafts to push them up.
Also, a split lever jack action. Which is what I'm going with as it looks like it uses less space depth wise
 The split lever jack action in raised position. The action needs twice the lifting height, plus the width of the frame that holds the levers, and a little extra space for it's cords.
Then it needs a wee bit extra leeway before it enters the selection box, which I haven't designed yet.
 That's the whole mechanism there. I may have made a mistake here, as I don't believe I need to leave any space between the fully extended jack action and the selection box there. I think I need the extra space between the box and the lifting pedal
In principle I see no reason why this system couldn't be simply automated with a continuously rotating wheel.
What I'm thinking about is an 8 shaft folding jack loom. The interesting part comes when I point out that I'm going to build an electric dobby controller into the bottom of it so it operates from one pedal and a computer program.
So far I've been thinking and thinking and I'm basically roughly copying the kind of frame you'd find in a Siever's school or Baby wolf loom. Basically it's like an X that folds up on itself with the castle in the middle. Should be able to reduce it's depth from 3 feet to about 1 for storage.
I don't think it's really that difficult to design the loom frame, aside from building the beams and making the ratchets and so on, which I may just jigsaw out of thick MDF. I have most of the wood I need asides from some panelling and I need to buy some aluminium sheet to make the shaft dividers with and also to hold the shaft bodies together with.
The rising levers will probably be made from mdf 6mm panelling, perhaps with rollers or aluminium plating on the ends to stop it from wearing.
underneath the levers there'll be about 8" of space for the wires to go down before entering the selection box, which shall be controlled by servo motors (I have them from a previous project, I also have the programming for a 16 shaft controller nearly done already and the electronics are all laid out so I'll just have to fit them into the new frame).
Then I have to figure out the best way to set up the pedal, whether front or back levered, or if there's a way I could easily create an assisted lift, or even put in a wheel there.
If I was to use a wheel then there's be less wasted mechanical energy in lifting and dropping the shafts, but it's a little complicated. Of course the thing about a rotary mechanism is it could just turn and turn and raise and lower the shafts automatically if powered by a motor or a bicycle pedal which then offers the possibility for further automation of the mechanism, though it's probably troublesome to install automatic beating and weft insertion on a 2ft wide folding jack loom.
But you never know, as long as the frame was sturdy enough I don't see a problem, assuming I can make all the mechanical parts out of MDF. I'm convinced it's possible, with enough tinkering.
Maybe I'll just start with a pedal then try adding a wheel for shedding.
Anyway, I'm going to throw up my diagrams here. As you shall see, I am not trained in the art of the technical draftsman


In order to reduce height and because i think it's pretty I've set it so the shafts will raise a couple inches out of the castle. I find that pleasing.
Also, a split lever jack action. Which is what I'm going with as it looks like it uses less space depth wise

Then it needs a wee bit extra leeway before it enters the selection box, which I haven't designed yet.
In principle I see no reason why this system couldn't be simply automated with a continuously rotating wheel.
Comments
cheers,
Laura
A few more pics of that ratchet is also on Weavo, here (scroll down a bit).